Markets 2018
Where to find our cheese kits!
Stay tuned for upcoming dates!
28 August, 2017
Stay tuned for upcoming dates!
19 August, 2015
From my experience, add seasoning; it gives it an added wow factor.
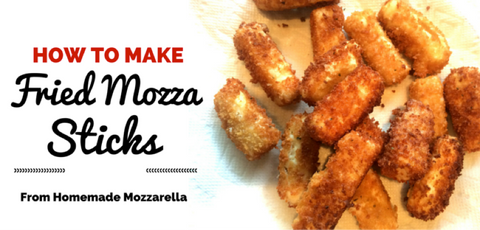
This recipe calls for homemade mozzarella made from scratch however if you don't have time you can buy mozzarella from the store. After you make or buy mozzarella, you can use it right away by making this recipe or store it in the freezer until you are ready to make these sticks. If you are adding chopped jalapeños, they are added during the mozzarella making phase, as you stretch and form your balls, drop a few pieces of jalapeños at a time into the folds of the cheese to knead them into the cheese as you go. If you are using fresh mozzarella with no added jalapeños or mozzarella that you bought from a store, be sure to add more spice in BOWL 3.
PREPARE 3 BOWLS:
BOWL 1: Combine the flour and cornstarch
BOWL 2: Beat the eggs and add water (and optional liquid smoke)
BOWL 3: Combine the bread crumbs and salt and chilli flakes


1. Fresh homemade mozzarella 2. Cut into strips 3. Dip into bowl 1: flour mix 4. Dip into bowl 2: egg mix 5. Dip into bread crumbs (this is panko) 6. Drop gently into hot oil (careful it is hot!)
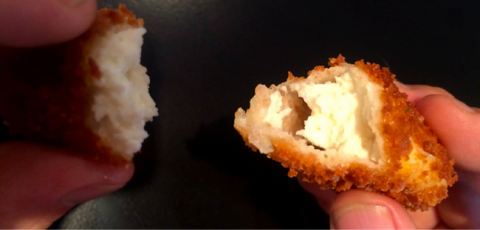
(this image above doesn't have the chopped jalapeños added..this was my first batch. Trust me you'll want to add them to give this recipe addictive qualities)

06 August, 2015

Makes: 2 cups (1 pint)
This recipe uses homemade yogurt from our recipe however you can use store-bought plain Greek yogurt. To find out how to make homemade Greek yogurt click here for the recipe.
This is a really creative way to add probiotics to your diet.
STEP 1: Grate the cucumber and drain the water that is released.
STEP 2: Mix together the yogurt, minced garlic, oil, vinegar and salt in the large bowl.
STEP 3: Combine the cucumber and the yogurt-mix together and serve right away or for best flavor chill in the fridge in a covered container overnight.
To add visual appeal, drizzle olive oil on top and sprinkle a few olives on top.


20 January, 2015

I use a lot of different products to help me in all aspects of my cheesemaking. Out of all of them, a good sanitizer is one of the most important products to use effectively. If your equipment and surfaces aren’t clean, great cheese isn’t possible. But what is clean? Check it out!
Sanitation is as important as any other step in the cheese making process.
Proper sanitation is not only about your health when consuming cheese, it is also about giving the enzymes and bacteria (your rennet and starter cultures) a chance to flourish in the milk.
For example, rennet is a very sensitive and finicky enzyme. It can easily be rendered inactive or useless if it finds itself fighting off the wrong mineral. The same can be said about bacterial cultures, when you add them to the milk they may be forced to compete with other unwanted bacteria in your milk and the end outcome will be an off-flavour.
Get out your dish-soap and scrub and remove any debris or caked on material on your equipment.
You can sanitize your equipment by either 1) Boiling it in hot water or 2) Using an acid-based sanitizer.
You can boil your equipment the night before making cheese or on the day of.
These sanitizers should be properly diluted in water. Let equipment dry off, no rinsing!
Soft plastics aren’t recommended for soaking in acid-based sanitizers. The sanitizer bottles should be stored in a safe area away from the reach of children. Please read the instruction on the label for best use.
Sanitizing should all be done the evening before making cheese.
My favorite sanitizer is Star San. It is an acid-based, no-rinse sanitizer that is effective and easy to use. StarSan works in just 1-2 minutes. We offer it on our website or you can find it on amazon here (affiliate link).
So far this is pretty straightforward. Nothing complicated.But before we move, I thought we should address some common misconceptions when it comes to sanitizing…
Whether you are using an acid or alkaline cleaner, it should not be used as the final procedure.
Remember clean isn’t the same as sanitized. Something can be clean in appearance but still be unsanitary…meaning bacteria that will negatively effect your cheese may be still on the surface.
If your equipment has debris or calcified curd attached to it, even the best sanitizer won’t be effective.
That’s why we started with cleaning the equipment in soap and water.
In other words, dirty equipment will always contain bacteria even if sanitizer applied.
A sanitizer isn't a replacement for a cleaning solution.
Sanitizing should be the final step after cleaning.
I am overstating the obvious for a reason. This may seem like common sense but when you get busy, you don’t want to skip over these basic steps.
Do not overuse sanitizers like Star San sanitizer. If you overdose the sanitizer, it may leave an unwanted residue or just cake on to the equipment. Your cheese may show small flecks the aging period, have a pasty texture or have off-flavours.
If you do want to improve the way the sanitizer performs, you can increase the contact time the equipment stays in the sanitizer.
This means that all blind areas, such as pot handles or racking wires, must be hand cleaned and sanitized, use of spray balls can be very effective.
Always blend cleaning or sanitizing chemicals into water. Not the reverse.
If you add water to strong acids, an extremely concentrated solution of acid is formed right away and a large amount of heat is released. So much heat is released that the solution may boil very violently or it may splash acid out of the container!
If you add acid to water, the solution that forms is diluted and the amount of heat that is released is not enough to vaporize, spew or splash.
ALWAYS ADD ACID TO WATER, NOT THE REVERSE
As you can see, there are a few sanitizing basic principles to learn if you are a beginner cheese maker or to refresh your memory for experienced cheese makers.
If you have have tips and tricks for cleaning and sanitizing your equipment, we would love to hear from you below.
Cheers, and I look forward to your thoughts and comments!
28 May, 2014

Make Cheese Inc is proud to call Claudia at Urban Cheesecraft a friend. Claudia is a genius when it comes to making recipes simple and approachable to beginners. ONE HOUR CHEESE hits a homerun when it comes to photographs, simple step-by-step instructions and creative cheese recipe ideas.
Not only does the book make cheesemaking doable and fun but also the recipes are designed to be done with your schedule in mind. If you are in the mood for bigger cheese projects like an aged parmesan down the road, then let this book be your introductory step and the rest will follow when you’ve built up your confidence...
10 February, 2014

...and add yogurt to the mix!
Now that you are making yogurt on a regular, breakfast is the first place to start injecting this healthy item into you day.
This is a no-cook recipe, the oats and chia seeds simply absorb your homemade yogurt overnight, making for a delicious breakfast meal - with no fuss for you in the morning...read more here
10 February, 2014

Ranch dressing is everywhere. You can't escape it! Don't try, it's delicious. But store-bought bottles of the stuff contain some peculiar ingredients and end up a far cry from the homemade probiotic version. I know we are turning a few of you into Yogurt Masters so throw a wee bit of the yogurt you are now in the habit of making weekly towards this recipe and have tangy treat to turn to for snack time...read more here
10 February, 2014
With that being the goal, from time to time we do end up with expired products on our hands, they are rarely sent from our supplier with a full year on the product. All cultures are still packaged for commercial cheese makers who use these products very quickly thereby negating the expiry times. We are still juggling these factors for smaller home cheese makers.
So you, the home cheese maker, will likely be faced with questions over what to do with leftover expired culture at some point.
Here's our philosophy on expiration dates...read more here
19 January, 2014

Admit it: you’re feeling bloated these days right? It’s the new year, and we all over indulged over the past month. It was wonderful wasn’t it? You can't be a cheese lover and not like to indulge a bit.
But now you are looking for fresh and healthy recipes to start the year off fresh. Well this month’s recipes will help you get you and your gut back and balanced for 2014.
Have you ever made your own yogurt? Getting into the habit of making this tasty treat will be worth your while this year. It’s dead easy and so good for you...
06 December, 2013

And now that you've made your awesome Buttermilk Eggnog if there's any left, you can make these fluffy beauties!...
![]()
![]()
![]()


Copyright © 2024 Make Cheese Inc. All Rights Reserved.
Designed by John Rawsterne | Ecommerce Software by Shopify